As I stated on my Fabulous Finds page, I found a couple of old doors at my local St. Vinny's for just $5 a piece!! One of the doors I used in my bedroom as a headboard, the other door was a bit more challenging because it had a window in it that I had to work with.
Then inspiration struck.......I LOVE the French Script look on pillows, furniture, cutting boards, etc. So I wanted to add my own French Script twist on the window of my door. Along with the French Script I wanted to incorporate our family name and the year that our family was established.
HERE IS WHAT I DID:
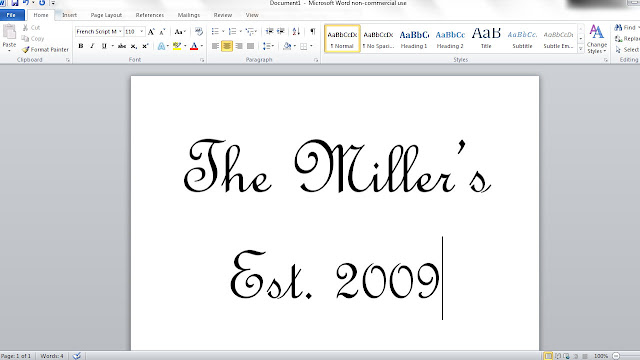
STEP 1- I created what I wanted to put onto my window in Microsoft Office using the "French Script" Style Font

STEP 2- I was recently researching free french script templates and found this great site http://thegraphicsfairy.com/category/french-typography/, she has some great free templates that you can download.
STEP 3- Since they come in a PDF I opened the file in Adobe Reader, zoomed the size down so I could see the whole document, then I took a screen shot of it by holding down the "control" key and hitting the "prt sc" key.
STEP 4- I then opened a blank document in my Photo Shop Program. I use Photo Impact but I think you could use any photo editing program. Then I right clicked and pasted the image into the blank document. Cropped out the pieces that I wanted to use and saved them as jpeg's so I could insert them into word as pictures.
STEP 5- Then I inserted the pictures into word and moved the images around until I found a design that I liked.
*One thing that is important when you insert the pictures into Word is that when you click on the picture make sure you right click and select "Wrap Text" and the select "Behind Text". (This allows you to be able to move your images around.)
This is what I came up with:
STEP 6- Once you have the image that you want, you can save the document. If the size is right for you, you are done. If you need to make the document bigger than an 8x11 sheet of paper you will have to keep reading.
I suggest using this website: http://www.blockposters.com/step1.aspx. This program will allow you to upload your picture and make it bigger.
REMEMBER: The program will only upload PICTURES, so you will have to make your word doc a jpeg. I suggest the screen shot technique that I described in step 3. Make sure to measure your transfer object so you know how big you need it for your surface.
STEP 7- Ok, so now the hard part is over, you can now print off your transfer image.On the Fairy Graphics Blog she talks about a couple of different options for transferring script to different objects.
You can read more on that here: http://thegraphicsfairy.com/12-easy-image-transfer-methods-for-diy-projects/.
Stay tuned to see how I transfer the image onto the window!! More to follow!!


No comments:
Post a Comment