Thursday, September 12, 2013

Old Door- REPURPOSED : Part 1!!


As I stated on my Fabulous Finds page, I found a couple of old doors at my local St. Vinny's for just $5 a piece!! One of the doors I used in my bedroom as a headboard, the other door was a bit more challenging because it had a window in it that I had to work with.


Then inspiration struck.......I LOVE the French Script look on pillows, furniture, cutting boards, etc. So I wanted to add my own French Script twist on the window of my door. Along with the French Script I wanted to incorporate our family name and the year that our family was established.  

HERE IS WHAT I DID:

STEP 1- I created what I wanted to put onto my window in Microsoft Office using the "French Script" Style Font
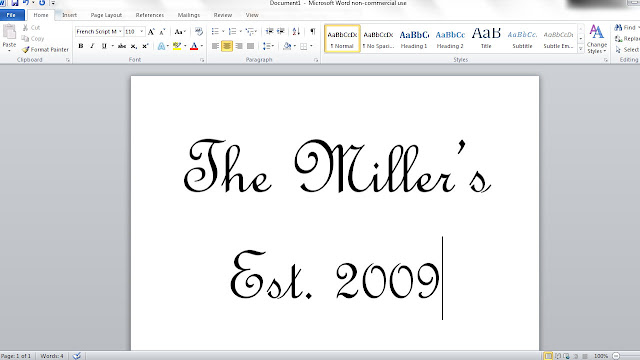


STEP 2-  I was recently researching free french script templates and found this great site http://thegraphicsfairy.com/category/french-typography/, she has some great free templates that you can download.


STEP 3- Since they come in a PDF I opened the file in Adobe Reader, zoomed the size down so I could see the whole document, then I took a screen shot of it by holding down the "control" key and hitting the "prt sc" key.


STEP 4- I then opened a blank document in my Photo Shop Program. I use Photo Impact but I think you could use any photo editing program. Then I right clicked and pasted the image into the blank document.  Cropped out the pieces that I wanted to use and saved them as jpeg's so I could insert them into word as pictures.


STEP 5- Then I inserted the pictures into word and moved the images around until I found a design that I liked.

*One thing that is important when you insert the pictures into Word is that when you click on the picture make sure you right click and select "Wrap Text" and the select "Behind Text". (This allows you to be able to move your images around.)


This is what I came up with:


STEP 6- Once you have the image that you want, you can save the document. If the size is right for you, you are done. If you need to make the document bigger than an 8x11 sheet of paper you will have to keep reading.

I suggest using this website: http://www.blockposters.com/step1.aspx.  This program will allow you to upload your picture and make it bigger.

REMEMBER: The program will only upload PICTURES, so you will have to make your word doc a jpeg. I suggest the screen shot technique that I described in step 3. Make sure to measure your transfer object so you know how big you need it for your surface.

   STEP 7- Ok, so now the hard part is over, you can now print off your transfer image.On the Fairy Graphics Blog she talks about a couple of different options for transferring script to different objects. 


Stay tuned to see how I transfer the image onto the window!! More to follow!!


Tuesday, September 10, 2013

How to Save $$$ on Baby Clothes


As moms you know how fast kids grow, especially babies between the ages of 0-2!! I never saw the point in spending a ton of money on clothes that are only going to last a month or two. So here are my top 5 tips to get good quality baby clothes for cheap.

Tip #1 Hand Me Downs

You know what they say, "the best things in life are free".....well so are the best clothes. Especially when they are just going to get spit up on and spilled down anyways. Sometimes the price is right, when it is FREE!! 

Tip #2  Garage Sales

Make sure you hit garage sale season with a vengeance. Garage sales are the best places to find baby clothes and gear. Usually you can get clothes anywhere from .25 cents to $1 a piece. I avoid garage sales where they want $2 a piece for clothes.Especially when I usually can find clothes for $2-$3 brand new from the Department Store Clearance Rack.

Tip # 3 Mom to Mom Sales

These are great for getting not only clothes, but other essential baby gear. Check your local papers for your local Mom to Mom Sales. They are better than garage sales because you are guaranteed that there are going to be baby items.

Tip #4  Second Hand Stores ( St. Vinny's , Good Will, Salvation Army, Etc.)

I LOVE 2nd hand stores!! I love the challenge of digging and finding really great stuff for cheap prices. I allot myself anywhere from 1-4 hours to dig at 2nd hand stores depending on the size of the store and what I am looking for that trip.

You can be successful too, just follow these quick tips:

#1 Make it Worth Your While!!
 You can usually tell when you walk in if it will be a hit or a miss. Give yourself an allotted amount of time to dig and if you aren't holding anything when your time is up, don't bother wasting anymore of it.

#2 The Beloved 1/2 OFF Color Tag!!
Most 2nd hand stores have signs when you walk in that will tell you if a certain color tag is half off that week. I follow the same garage sale philosophy here, I can find brand new store items for $2 - $3 so I wont pay it at Goodwill. Know the Color and keep it in the back of your mind while shopping, sometimes you can find basically the same items in the same condition but one is 1/2 off and the other is full price.

#3 DIG, DIG, DIG!!
I have made out BIG at 2nd hand stores by getting down and dirty!! I go through every rack, and bin available. I have scored some good finds from .35 cent clothes, to .90 Cent  BRAND NEW COLUMBIA Zip-Ups, to Christmas Outfits and MORE!!

#4 Plan Ahead!!
I have tubs for both of the kids from Newborn to Age 5 Clothing. If it is in awesome condition and only a dollar or two I am grabbing it, even though they don't need it now (They will need it eventually). I especially like to do this with Winter Coats, Snow Pants, Jeans, Sweaters, and Swimwear!!

#5 Know What You Have
Since I buy everything ahead of time I had to be careful not to overbuy for one size and under buy for another.

 For example, I love little boys cargo pants and I stocked up!!! So when I saw them for .65 cents I grabbed them for Coop and threw them up in the bin in his closet. When the time came for his 18 month bin to come down he had 15 pairs of cargo pants!!! I had bought him 5 khaki, 4 Brown, 2 Gray, 2 Blue and 2 Green!! Wow!!! It was a little unnecessary. I didn't know what I had so I  ended up overbuying....not a good idea.

Just remember to dig and keep in mind what you could find brand new. (Don't pay more for used when you could get new!) With many of the Department Stores taking an extra 40%-70% off the clearance price you can find some awesome department store deals, especially if you buy out of season!!!

Here is some 2nd Hand Inspiration to get you motivated !!

Coop's .90 Cent Columbia Zip-Up


$50 Graco 4-1 Convertible Crib


$4.99 Toddler Rocker
You may have also saw on my Fabulous Find Page the Toddler Rocker that I got for Coop from Goodwill for $4.99!!


Food For Thought- Don't be Afraid to Haggle
If you feel something should be a lower price, don't be afraid to ask. Most of the time people just want to get rid of the stuff. Even if they may not take your initial offer but they may come down a little.

Happy Bargining!!!

Monday, September 9, 2013

September Menu Ideas

Here are my meals for the month of September, I hope this inspires you with your monthly menu!!!


Check back each month for more menu ideas. Also, watch for my recipe of the month....coming soon.
 
If you would like to down load my menu:
 

Tuesday, September 3, 2013

The Big Sandwich Recipe

OK, Here it is what you have all been waiting for....The "Big Sandwich" recipe!!! This is a BIG hit with my manly, man husband who loves MEAT, MEAT, MEAT!! 


Here is what you'll need:

1 Loaf of French Bread or A Big Round Loaf
1 Pkg of Turkey Lunch Meat
1 Pkg of Ham Lunch Meat
1 Pkg of Roast Beef Lunch Meat
8 Slices of American Cheese
2 Sticks of Butter or Oleo (Softened)
2 TBSP Minced Onions
2 tsp Lemon Juice
1 tsp Garlic Salt
1 tsp Mustard 


STEP 1-  Mix together the Mustard, Minced Onions, Garlic Salt, Lemon Juice, and Butter until "well blended" to make a spread for your sandwich.

STEP 2- Cut Your French Loaf in half length wise. Spread the butter mixture onto each of the 2 pieces of bread.


STEP 3-  Place 4 Slices of Cheese on each of the pieces of bread. 
( I was one short so I only used 7 slices) 


STEP 5- Layer on your lunch meat


STEP 6- Wrap in Tin Foil


 STEP 7- Bake at 350 for 20-25 minutes. Until cheese and butter are melted. 


 THERE YOU HAVE IT....
NOT THE HEALTHIEST BUT IT SURE IS TASTY!!

 
 Happy Cooking!!